
The following is a guide designed to make clear the real nitty-gritty of navigation within WILD. It discusses all four components of WILD—the Book, Collections, World, and Picture Dictionary—but it focuses most particularly on navigation within the Collections and within the WILD World. If you are looking for just a basic overview of WILD functionality, you may wish to go to the Quick-Start Guide to using WILD.
This detailed guide is intended to assist teachers in using WILD’s entertaining visual components to their fullest potential in support of learning. In particular, it seeks to help teachers understand the ways in which they can both allow their students to explore WILD in a fun and independent way as well as to call their students’ serious attention to those things they desire them to learn or to learn about.
The Book: Navigation to and from the expanded entry
The Book’s expanded entry for a word is the place where the largest amount of information about a word is found, as it contains all its images (both illustrations and photographs), definitions, example sentences, and translations. Expanded entries are reached by typing a word into the search box, clicking on the “See more” instruction next to a word on the top level of the Book, or by clicking on an image or entry icon in one of the other WILD components.
Besides being a repository of information about a word, the full Book entry is also the hub that links it to all the other parts of WILD where the word can be found. Every entry in the Book contains the banner “Places with this word.” Under this banner are listed all the different WILD environments where this word appears.
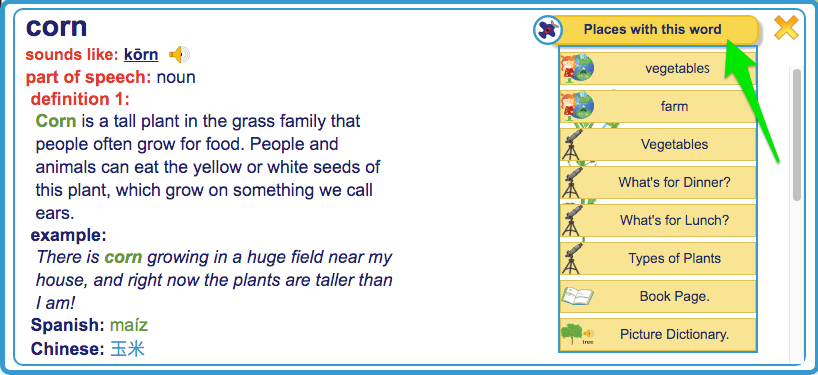
For example, if you are looking at the entry for “corn,” you can see in the “Places with this word” menu that “corn” can also be found in the Vegetables setting in the Grocery Store in the City. It can also be found in the Farm setting in Nature as well as in the Types of Plants collection, the What’s for Dinner collection, and the Vegetables Collection. Clicking on any one of these labels under “Places with this Word” takes you to the labeled environment. Once in an environment outside the Book, you can always click on the word’s image or entry icon in that environment and return to the word’s entry in The Book. Then, using “Places with this word,” you can navigate again to see the same word in another environment.
Navigation within the Book component
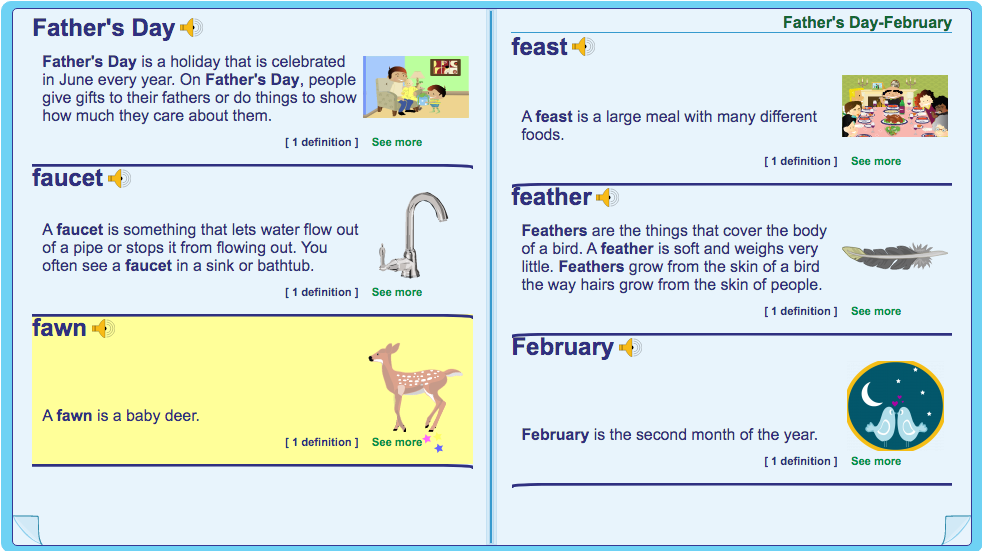
“The Book Page” in the “Places with this word” menu refers to the top level of the Book, which has the appearance of an open dictionary. The “pages” of the Book display images and concise dictionary entries. (They do not offer multiple meanings of words, example sentences, pronunciation, or grammatical information.) Navigating in the Book is done by turning the “pages” or using the search box at the top of the sidebar. Clicking on the “See more” instruction for a word opens the item’s full expanded entry.
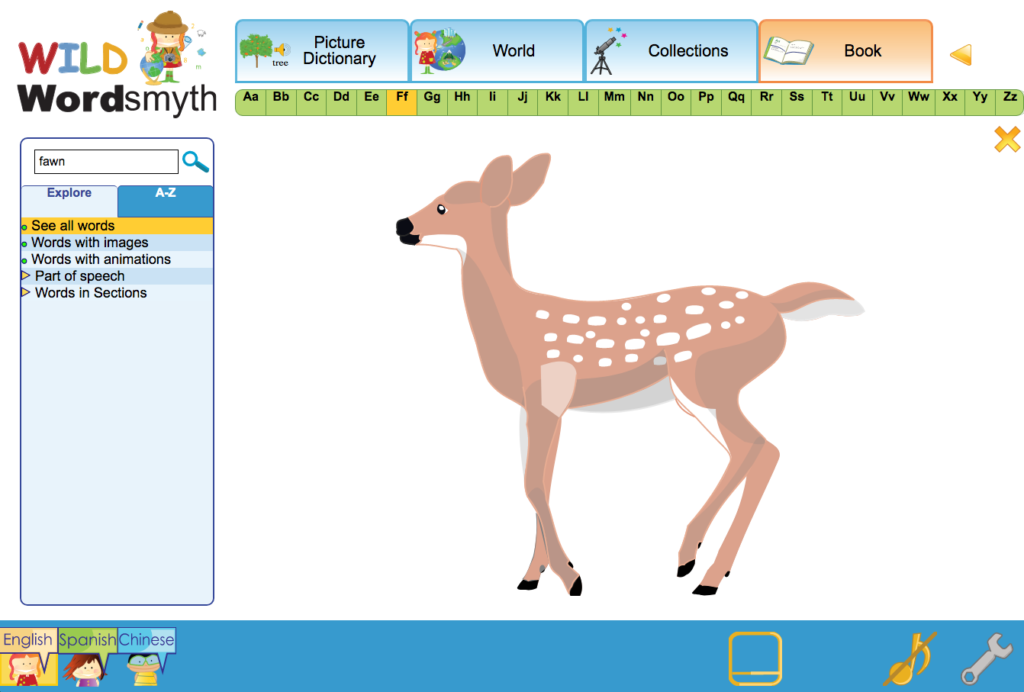
It may be useful to note that the largest images for any item in WILD are found in the Book Page environment. So, for example, there is an illustration for “fawn” in the Young Animals collection and in the expanded dictionary entry, but the “fawn” illustration is at its largest size when you click on the image in the Book Page environment. The many photographs included in WILD are also at their largest size in this environment.
Please note that if you have navigated to the Book Page image from a place in the Collections or World, you can easily get back to your earlier place in either of those environments by using the back arrow at the top right of the screen next to the Book tab.
Navigation within the Collections component
Sidebar navigation versus navigating within the main display: WILD offers two main arenas in which to navigate: the sidebar and the main display. Teachers are more likely to navigate using the sidebar while children are more likely to navigate within the main display. The sidebar provides a more direct way of finding items in WILD and allows the teacher to better control what children are viewing in the main display. This lets the teacher focus the students’ attention on selected items that are to be taught or discussed.
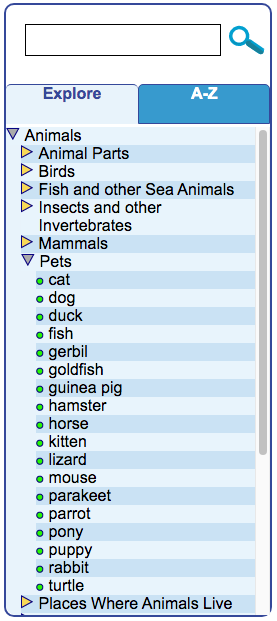
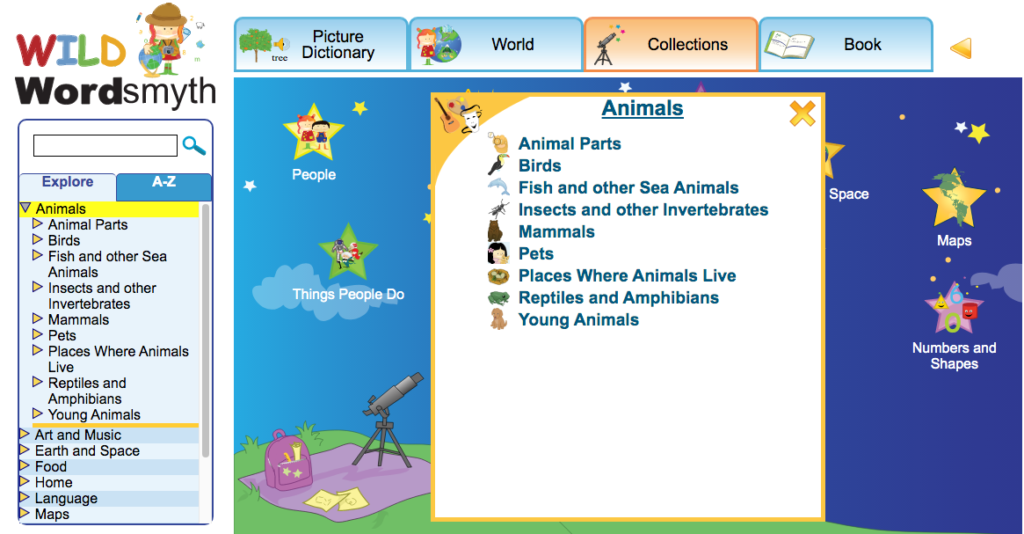
Using the sidebar in Collections: The Collections component is made up of twelve top categories and numerous individual “collections” under each category. The screenshot here shows the top category “Animals,” for example, with its numerous collections, such as “Birds,” “Pets,” “Young Animals,” and “Mammals.” Clicking on a top category label in the sidebar will display there the names of collections that can be accessed under that category. It will also open a visual/textual menu of these collections in the main display, as in the screenshot above. Clicking on the name of a collection in either place will open the collection so that its individual items can be viewed—“ostrich,” “parrot,” “toucan” in the Birds collection, for example. In the sidebar, individual items that make up a collection will appear in a bulleted list under the collection name.
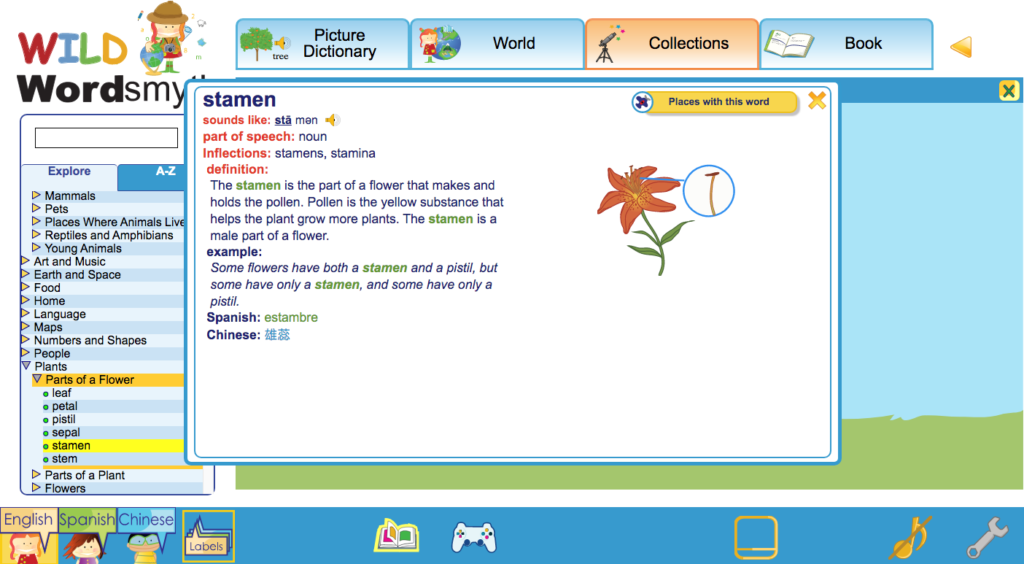
The teacher can also use the sidebar to pop up a desired item from an open collection in the main display (e.g., “stamen” in the “Parts of a Flower Collection”). Popping up an item both expands its image and brings up its audio and dictionary icons. This is done by single-clicking on that item in the sidebar. Double-clicking, or clicking a second time, on a word’s label in the sidebar will pop open the dictionary entry for that item in the main display. The dictionary entry will show the definition, one or more example sentences, translations, images, as well as other information. (It’s important to note that images in the Book entry can be popped up larger than they first appear and that the Book entry will often contain multiple photographs in addition to the illustration that comes from the collection. If even larger images are desired, clicking on “Book Page” under “Places with this word” will allow you to access images of the item that are even larger.)
The yellow triangle (or “arrow”) next to a top category or collection name in the sidebar can be used for viewing other menus and lists of individual words that make up collections while leaving the main display unchanged. Single-clicking on any of the triangles allows teachers to search through other categories and collections while students continue to view what has already been selected for viewing in the main display. (If one should double-click on a triangle, it will have the same effect as clicking on a sidebar label, however. It will open up a menu or collection in the main display.)
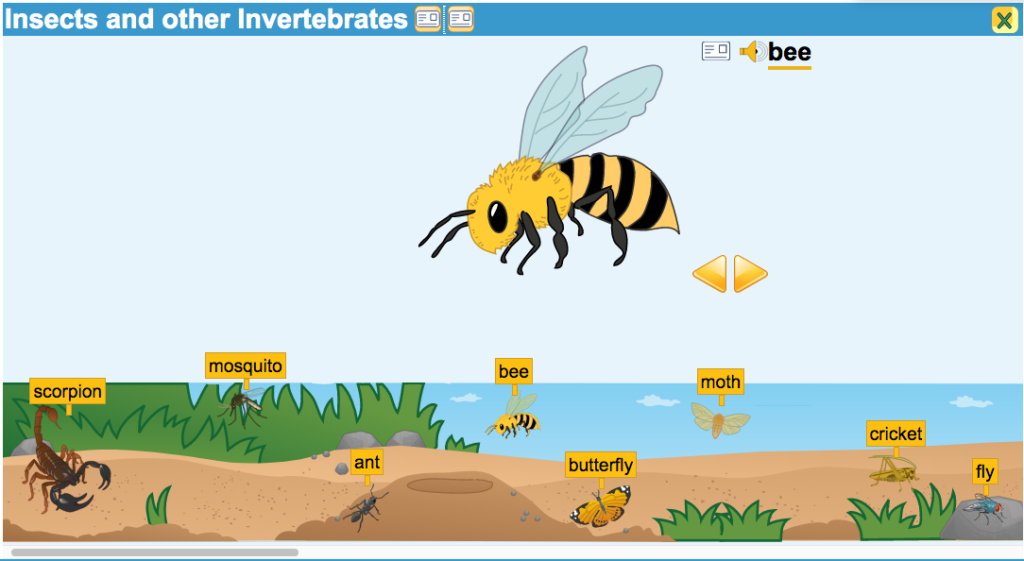
Collections navigation within the main display: When a child (or teacher) mouses over a category in the “stargazer” visual menu—the top level for Collections in the main display—it will simply highlight the image in yellow. Clicking on the image will open the menu of collections for that category in the center of the screen. Making a selection from the menu brings up the selected collection. When opened, the name of the collection (e.g., “Insects and Other Invertebrates,” “Reptiles and Amphibians”) will appear in the blue banner at the top of the display, and Book entry icons next to the collection name will let the child look up the meaning of any unknown words contained in that name in the Book.
Collections are typically displayed as a set of images in a strip which the child can scroll through. Each image in the strip can be clicked on to pop up a larger image of the item. Once an image is popped-up, its audio icon and Book entry icon will appear, giving access to the word’s audio pronunciation and its defining information in the Book. From the popped-up image, the child can also choose to use the navigational arrows to see other popped-up images from the collection instead of scrolling through the strip.
Once an image of an item is popped up, its Book entry can also be accessed by clicking directly on the popped-up image or clicking once again on the item in the strip. Once finished with the Book entry, using the close box or clicking away from the entry will return one to the strip and popped-up image.
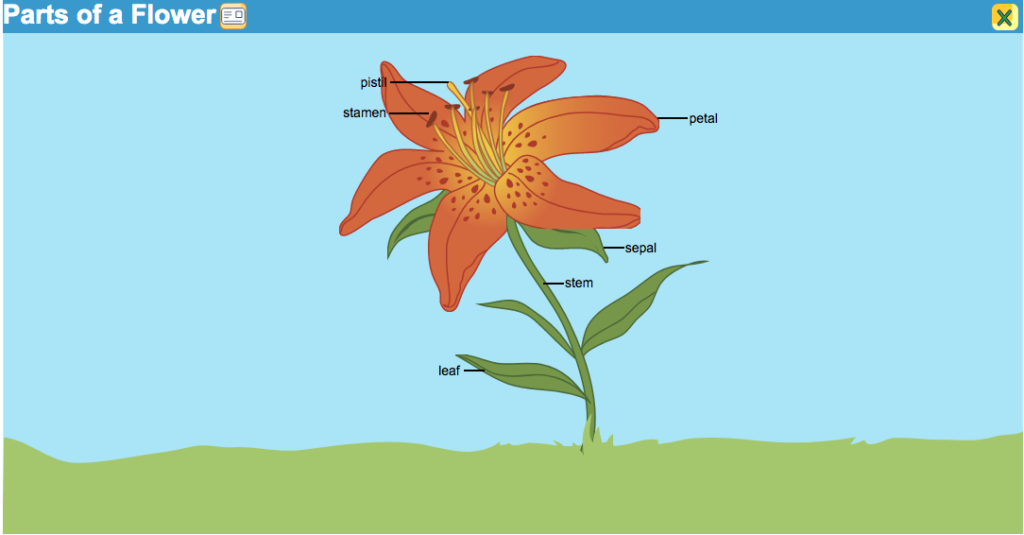
While most collections use the strip format, certain collections are displayed in diagram fashion with one large illustration marked with individual labels. For example, the “Parts of a Flower” collection shows the plant parts labeled on a single illustration of a flower. Mousing over a labeled plant part will highlight it and give access to audio pronunciation for its name as well as defining information in the Book.
When the child is ready to view a different collection from the same top category, the back arrow located at the top right next to the Book tab can be used to leave the current collection and go back to the previously selected menu. So, if one is in the “Flowers” collection, for instance, one can use the back arrow to see other collections under the “Plants” menu. (The back arrow can, of course, be used within any component to return to the previous screen.)
If the child wishes to leave the collection and go to a different component of WILD or to the main Collections menu, the tabs at the top of the display can be used to go to the top level of any WILD component—the stargazer menu in Collections, the choice of City or Nature in the World, or the first page of the letter A in the Book or Picture Dictionary.
Navigation within the World component
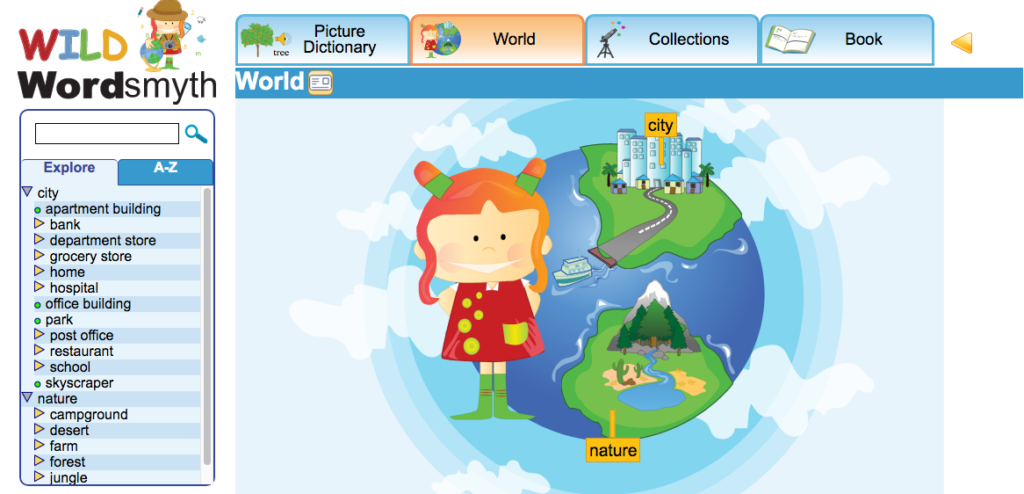
Sidebar navigation in the World: The World is made up of a large number of different settings divided between City settings such as “School,” Home,” and “Grocery Store” and Nature settings such as “Forest,” “Seashore,” and “Desert.” Within these settings are further sub-settings, such as “Menu” in the “Restaurant” and “Music Room” in the “School.” Some sub-settings even have sub-settings of their own, such as the “Refrigerator” in the “Kitchen” of the “Home” in the City.
When the sidebar shows the initial choice of City or Nature, single-clicking on one of the labels will highlight the category image in the main display and darken the rest of the display, but it will not affect what is visible in the sidebar. Double-clicking, or clicking a second time, on either the City label or Nature label in the sidebar will display the menu of settings under the chosen category in the sidebar and will also open the visual menu in the main display. Once the settings menu is visible under either Nature or City, a single click on the other label will reveal the settings menu for that other category.

Double-clicking, or clicking a second time, on a setting label, such as “Seashore” or “Hospital,” will reveal in the sidebar the alphabetized names of individual items in the setting as well as the names of any sub-settings, such as “Ocean” or “Waiting Room,” for example. It will also open the setting in the main display.
Single-clicking on a setting label in the sidebar will simply highlight that setting in the main display while the other parts of the display are darkened. It will not affect what is seen in the sidebar. However, once one setting has been opened and the contents have been revealed, a single click on any other setting label at the same level of operation will show the list of its contents and open that setting in the main display. (Sub-settings, such as the “Den” in the Desert setting or “Pond” in the Forest setting, are at a level below the main settings, so opening these sub-settings, requires a double-click. A single click will highlight a sub-setting and darken the rest of the setting.)
The ability to highlight a setting in the main display without opening it allows the teacher to discuss the concept of that setting (or sub-setting) with students without having to present them with all the visual and textual information that the opened setting offers, which could potentially distract the students from the discussion. This is the strategy behind there being a difference between single-clicking and double-clicking on these sidebar labels.
If a setting is currently open and one wishes to go back to just highlighting other settings rather than immediately opening one or more of them at that level, all that is necessary is to click on the label of the category above the current level. So, for example, if the Seashore is open and one wants to return to highlighting other settings such as Forest or Desert in the main display, one would click on the Nature label. This closes the Seashore and makes the other main Nature settings visible again.
As with the Collections, the yellow triangle, or “arrow,” next to a setting name can be used to search through menus and lists of words in the sidebar while not affecting what is being viewed in the main display. A single click on a triangle reveals the contents of a setting—its individual words and sub-settings–but does not open the setting in the main display. The teacher can also view the contents of multiple settings at the same time by single-clicking on multiple triangles.
At any point that the teacher wishes to focus students’ attention on a particular word while navigating in the World, its listing in the sidebar can be single-clicked to highlight the item in its setting. (The rest of the setting will darken.) Double-clicking on the word’s listing in the sidebar will open the item’s Book entry. A larger image and possibly additional images can be accessed there as well as other dictionary information. The search box, can, of course, be used at any time to highlight a word in a setting or go to its entry if it is not contained in the current setting.
It should be noted that because the highlighting of large items in a setting in the main display can sometimes overlap with that of smaller items in the setting, smaller items can sometimes be tricky to highlight and select—the highlighting of the larger item blocks the smaller items, in other words. When this occurs, the sidebar can be used to highlight and select these smaller items. Album view can also be used in these cases, as album view isolates each item from the rest of those in the setting, making each clickable. (Album view can be turned on by clicking on its icon in the footer.) The sidebar and album view can be useful for this same purpose in the Collections, particularly in the World Maps, where smaller countries can sometimes be blocked by the highlighting of larger ones.
Main display navigation in the World: The main display is designed for easy navigation and exploring. When a child (or teacher) mouses over a setting in the main display, the setting is highlighted and three icons appear: the audio icon, Book entry icon, and airplane icon. Clicking the airplane icon opens the setting. Clicking within the yellow box surrounding the setting also opens it and displays sub-settings contained within it as well as individual items that make up the setting.
Once in a setting, a child may explore individual word items by mousing over images or clicking on them. Mousing over an item highlights it and brings up its audio icon and Book icon. Clicking on an item immediately opens its Book entry. (Note that it is the item itself, the image, that is clicked on. Clicking on a word label in a setting does not cause any action to occur.)
When mousing over images in a setting, the child will find that some highlighted images have airplane icons and others do not. The airplane indicates that the image represents not only a word but a setting—the Tidepool, for example, in the Seashore setting. The child can enter the setting by clicking on the airplane icon or by clicking within the highlighting box surrounding the image.
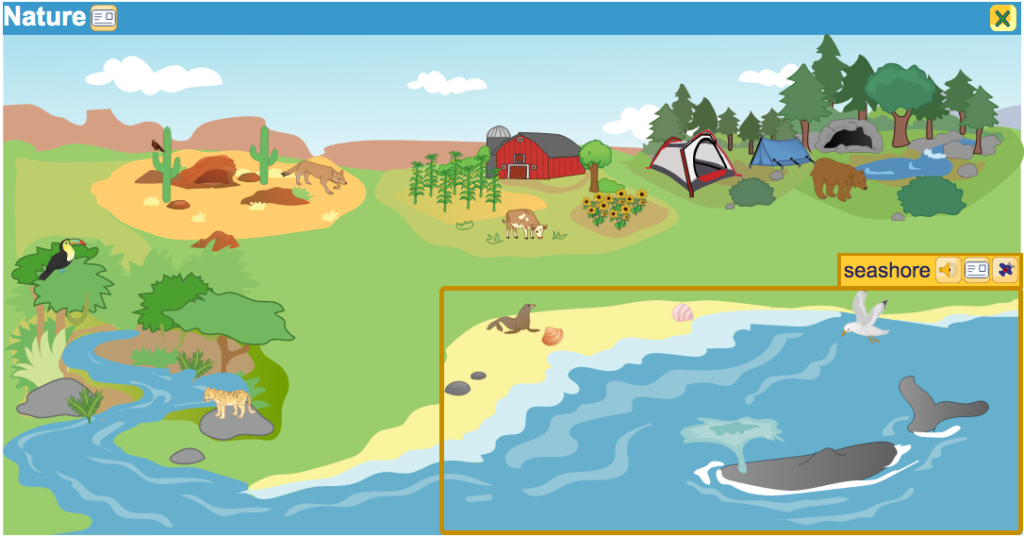
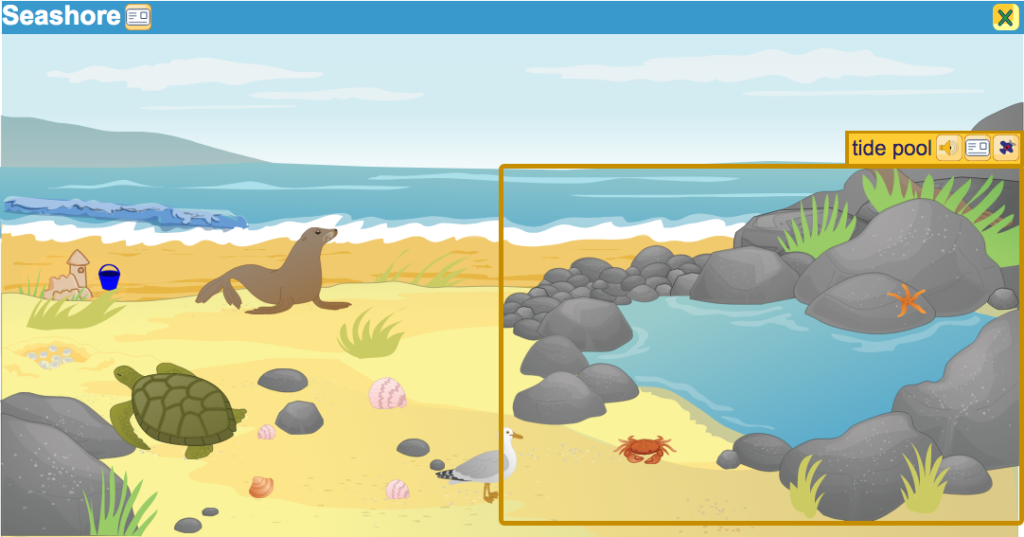
One scenario for World navigation in the main display might include clicking on the image at the top level to open Nature, clicking to open the Seashore setting, hearing how to pronounce the word “sea turtle,” looking up the word “tide pool” by clicking on its entry icon, clicking off the Book entry and looking again at the Seashore, clicking to open the Ocean setting, and, finally, reading a bit about starfish.
After exploring in one setting, the child may leave that setting by clicking on the close button or using the back arrow. Then the child can click on any other highlighted setting. In addition, as in the Collections, it is always possible to click on any one of the tabs at the top of the screen to go to the top level of any of the WILD components.
Navigation in the Picture Dictionary
Children can browse through the Picture Dictionary by clicking on the yellow navigational arrows in the main display or by using the scroll bar on the left side of the screen. Children can also use the thumb index at the top of the page to go to words beginning with a certain letter. Of course, teachers can navigate directly to a particular word by using the search box.
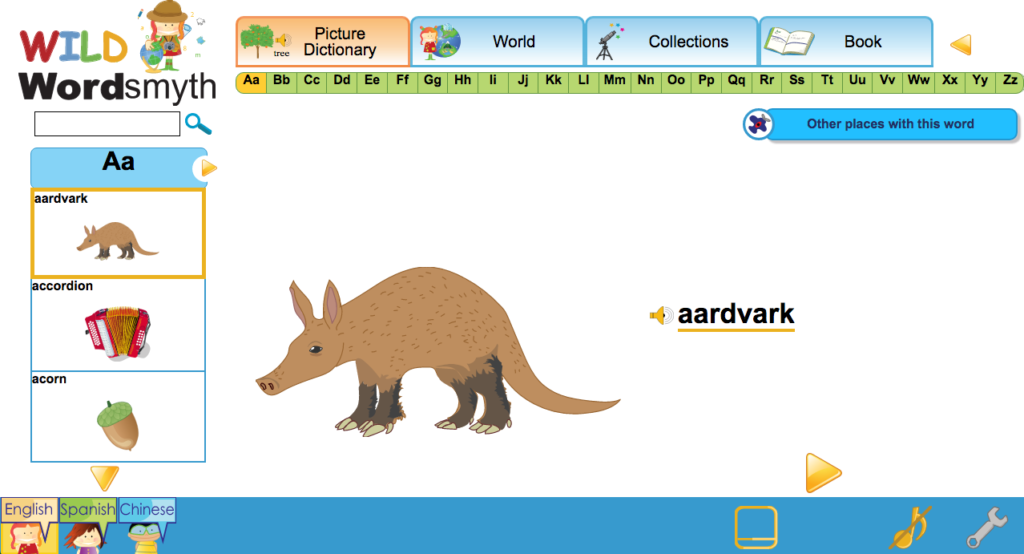
The Picture Dictionary defines words by picture only, but more information can be easily accessed through the word’s link with its dictionary entry in the Book. From there the child can navigate to that word in any other environment where it appears in WILD.